March 20, 2020

Hiya!
Years ago I had a wee issue with high blood pressure.
Well, maybe not so wee...
I was put on medication. Problem was it made me feel like I was walking through mud. I could barely think
straight. As the owner operator of a restaurant at the time, working a minimum of 70, sometimes up to 90 hours a week, being fuzzy headed and mud-slow was not feasibly functional. My doctor tried lesser doses, different brands,
etc., with the same result. The doctor said I was just going to have to figure out how to deal with the “slow feeling.”
Instead, I decided to get in control my BP starting with food and healthy habits. If you’ve
ever read labels in canned or processed “healthy” foods you’ll see two distinct things:
high sodium and/or high sugar.
If they reduce the fat then they increase sodium and/or sugar (fructose/sucrose/dextrose/syrup).
Neither salt nor sugar are good for heart health or BP. Because of this I started eating only lean proteins and steamed vegetables. I have personally been successful in lowering my BP this way. (This is NOT a medical opinion
or diagnosis, always check with your own doctor regarding medications.)
It has not been easy but rather a focused effort on a daily basis. It is also what started my own journey to start making more things from scratch. At the restaurant, I started to create
our own season-all instead of buying the over-the-counter expensive varieties. I discovered through research, trial and error, how to reduce salt through utilizing other spices and techniques to enhance flavors.
However,
one thing I missed was taking a spoonful of peanut butter or spreading some on a celery stick. Store bought natural or organic peanut butters still had 90mg of sodium per serving and added sugar. Plus they're twice as expensive as the others.
 I had seen these posts of how easy it is to make your own nut butters. I tried it with standard food processors (all I had at the time) and they always turned out gritty. Even when I had soaked
the nuts overnight like some recipes suggest. I’m a creamy not chunky fan. Then I bought a new high-speed blender (FYI - mine is a Ninja-Chef, cost me about $100 at Walmart, and I do NOT receive any kickback or payment from them). You can get whatever brand you want. What I really liked about this one is the fact that
it has an automatic setting for things like nut butters.
I had seen these posts of how easy it is to make your own nut butters. I tried it with standard food processors (all I had at the time) and they always turned out gritty. Even when I had soaked
the nuts overnight like some recipes suggest. I’m a creamy not chunky fan. Then I bought a new high-speed blender (FYI - mine is a Ninja-Chef, cost me about $100 at Walmart, and I do NOT receive any kickback or payment from them). You can get whatever brand you want. What I really liked about this one is the fact that
it has an automatic setting for things like nut butters.
This means you don’t have to pause after a 30 seconds and scrape the sides. You don’t have to reduce the speed, then increase the speed. This machine takes all those steps
and does it for you automatically. BRILLIANT !
 I took pictures of the different stages so you can see
(some are blurry because its through the plastic pitcher
of the blender).
FIRST...
I oven roasted 16oz bag of spanish peanuts, unsalted of course, with the skins on.
350F for 10 minutes
Oven roasting helps to release the natural oils and also add a toasted flavor which helps off-set the lack of sodium :)


SECOND: I placed the cooled roasted nuts onto clean lint-free dish towel and began rubbing together with the towel and my clean hands to remove a good portion of the skins. Honestly, this was the most time consuming aspect.
I didn't remove all of them, but as you can see, quite a few came off.
( Too many skins will dry out your nut butter and you may have to add oil to loosen it up.)
 Too many skins will dry out your nut butter and you may have to add oil to loosen it up.)
THIRD:
I then placed the reduced skinned peanuts inside my high speed blender. Turned the dial to Nut Butter and pressed Start.

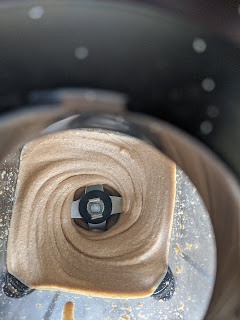
Half-way through the automatic 2 minute nut butter cycle. . .
I used the tamper that came with the blender to knock
down the sides a little. It wasn't really necessary as the machine was
cycling from high to medium speeds and really doing all the work for me.
But it made me feel like I was doing something important :)

Three quarters done. . .

After 2 minutes, just look at this beautiful creamy texture.
I added 1/2 tsp of sea salt in last 15 seconds of blending.
No oil.
No sugar.

After, trying a teaspoon full, licking every delectible speck off, I declared SUCCESS!
Redaction: EASY PEASY SUCCESS!
I love my high speed blender.

I then used my new raw peanut butter to make some Oatmeal Peanut Butter
Snack Balls with a little toasted unsweetened coconut flakes.
I added just enough honey to these to make them stick together and for some natural sweetness*.
Next time I’m going to try them using Medjool Date paste which is another way to get a little sweetness. I’ve made this paste from scratch before too.
Its easy... but that’s for another post.
Cheers !
Chef Shelly
Montana Flavor
www.ChefShellyMeyer.com
www.facebook.com/ChefShellyMeyer/
instagram: @ChefShellyMeyer
www.ChefShellyMeyer.com
www.facebook.com/ChefShellyMeyer/
instagram: @ChefShellyMeyer
*NOTE: Naturally derived sweetness from fruit or maple syrup and honey are easier for your body to digest; hence it doesn’t have as bad of side effects as refined sugar. Still, moderation in all things;
especially sweet and salty, that’s the best for all around health.