March 20, 2020
Hiya!
Years ago I had a wee issue with high blood pressure.
Well, maybe not so wee...
I was put on medication. Problem was it made me feel like I was walking through mud. I could barely think
straight. As the owner operator of a restaurant at the time, working a minimum of 70, sometimes up to 90 hours a week, being fuzzy headed and mud-slow was not feasibly functional. My doctor tried lesser doses, different brands,
etc., with the same result. The doctor said I was just going to have to figure out how to deal with the “slow feeling.”
Instead, I decided to get in control my BP starting with food and healthy habits. If you’ve
ever read labels in canned or processed “healthy” foods you’ll see two distinct things:
high sodium and/or high sugar.
If they reduce the fat then they increase sodium and/or sugar (fructose/sucrose/dextrose/syrup).
Neither salt nor sugar are good for heart health or BP. Because of this I started eating only lean proteins and steamed vegetables. I have personally been successful in lowering my BP this way. (This is NOT a medical opinion
or diagnosis, always check with your own doctor regarding medications.)
It has not been easy but rather a focused effort on a daily basis. It is also what started my own journey to start making more things from scratch. At the restaurant, I started to create
our own season-all instead of buying the over-the-counter expensive varieties. I discovered through research, trial and error, how to reduce salt through utilizing other spices and techniques to enhance flavors.
However,
one thing I missed was taking a spoonful of peanut butter or spreading some on a celery stick. Store bought natural or organic peanut butters still had 90mg of sodium per serving and added sugar. Plus they're twice as expensive as the others.
 I had seen these posts of how easy it is to make your own nut butters. I tried it with standard food processors (all I had at the time) and they always turned out gritty. Even when I had soaked
the nuts overnight like some recipes suggest. I’m a creamy not chunky fan. Then I bought a new high-speed blender (FYI - mine is a Ninja-Chef, cost me about $100 at Walmart, and I do NOT receive any kickback or payment from them). You can get whatever brand you want. What I really liked about this one is the fact that
it has an automatic setting for things like nut butters.
This means you don’t have to pause after a 30 seconds and scrape the sides. You don’t have to reduce the speed, then increase the speed. This machine takes all those steps
and does it for you automatically. BRILLIANT !
(some are blurry because its through the plastic pitcher
of the blender).
FIRST...
I oven roasted 16oz bag of spanish peanuts, unsalted of course, with the skins on.
350F for 10 minutes
Oven roasting helps to release the natural oils and also add a toasted flavor which helps off-set the lack of sodium :)
SECOND: I placed the cooled roasted nuts onto clean lint-free dish towel and began rubbing together with the towel and my clean hands to remove a good portion of the skins. Honestly, this was the most time consuming aspect.
I didn't remove all of them, but as you can see, quite a few came off.
THIRD:
I then placed the reduced skinned peanuts inside my high speed blender. Turned the dial to Nut Butter and pressed Start.
Half-way through the automatic 2 minute nut butter cycle. . .
I used the tamper that came with the blender to knock
down the sides a little. It wasn't really necessary as the machine was
cycling from high to medium speeds and really doing all the work for me.
But it made me feel like I was doing something important :)
Three quarters done. . .
After 2 minutes, just look at this beautiful creamy texture.
I added 1/2 tsp of sea salt in last 15 seconds of blending.
No oil.
No sugar.
After, trying a teaspoon full, licking every delectible speck off, I declared SUCCESS!
Redaction: EASY PEASY SUCCESS!
I love my high speed blender.
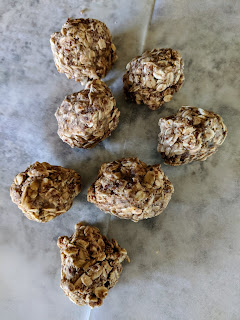
I then used my new raw peanut butter to make some Oatmeal Peanut Butter
Snack Balls with a little toasted unsweetened coconut flakes.
I added just enough honey to these to make them stick together and for some natural sweetness*.
Next time I’m going to try them using Medjool Date paste which is another way to get a little sweetness. I’ve made this paste from scratch before too.
Its easy... but that’s for another post.
Cheers !
Chef Shelly
Montana Flavor
www.ChefShellyMeyer.com
www.facebook.com/ChefShellyMeyer/
instagram: @ChefShellyMeyer
www.ChefShellyMeyer.com
www.facebook.com/ChefShellyMeyer/
instagram: @ChefShellyMeyer
*NOTE: Naturally derived sweetness from fruit or maple syrup and honey are easier for your body to digest; hence it doesn’t have as bad of side effects as refined sugar. Still, moderation in all things;
especially sweet and salty, that’s the best for all around health.


